I love shooting outdoors. Aside from being a fashion blogger, I am also a photographer for work. I get a lot of questions on lighting so I wanted to share this neat little trick with you.
Combining my subjects with beautiful open natural outdoor space is definitely one of my favorite things. Natural light is amazing to capture but sometimes it can be tricky and can use a boost. That’s when I pull out my magic trick: the reflector.
Here’s an example of an image shot using the reflector:
Notice how this little boy’s eyes light up and the pretty skin tones? That’s that magical reflector working.
For my beginers, here is some basic info on reflectors.
What does a reflector do?
Well, it reflects light. It enhances those pretty catch lights in your subject’s eyes and fill in shadows on the face.
What size reflector should I have?
Reflectors come in many shapes and sizes. They are light and usually collapsible. I like to carry a small 24 inch one for children or headshots. For bigger groups, a larger reflector is key- or it won’t work on everyone. If you can’t afford one yet, I know many photographers who have taken a poster board and simply laid aluminum foil onto it.
What color reflector do I need?
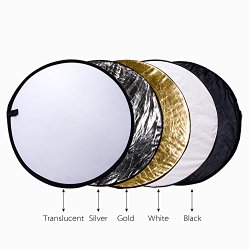
Reflectors normally come with a few different colors depending on which you buy. Most have silver, gold, white and black. I usually use the silver for general stuff. However, if you want a warm glow, use the gold. Also, go by the person’s skin- person who has olive tones- use the gold. If the person is more pale and has pink tones- use silver or white.
Here’s an inexpensive one I like:
Do you use reflectors? Why or why not?
